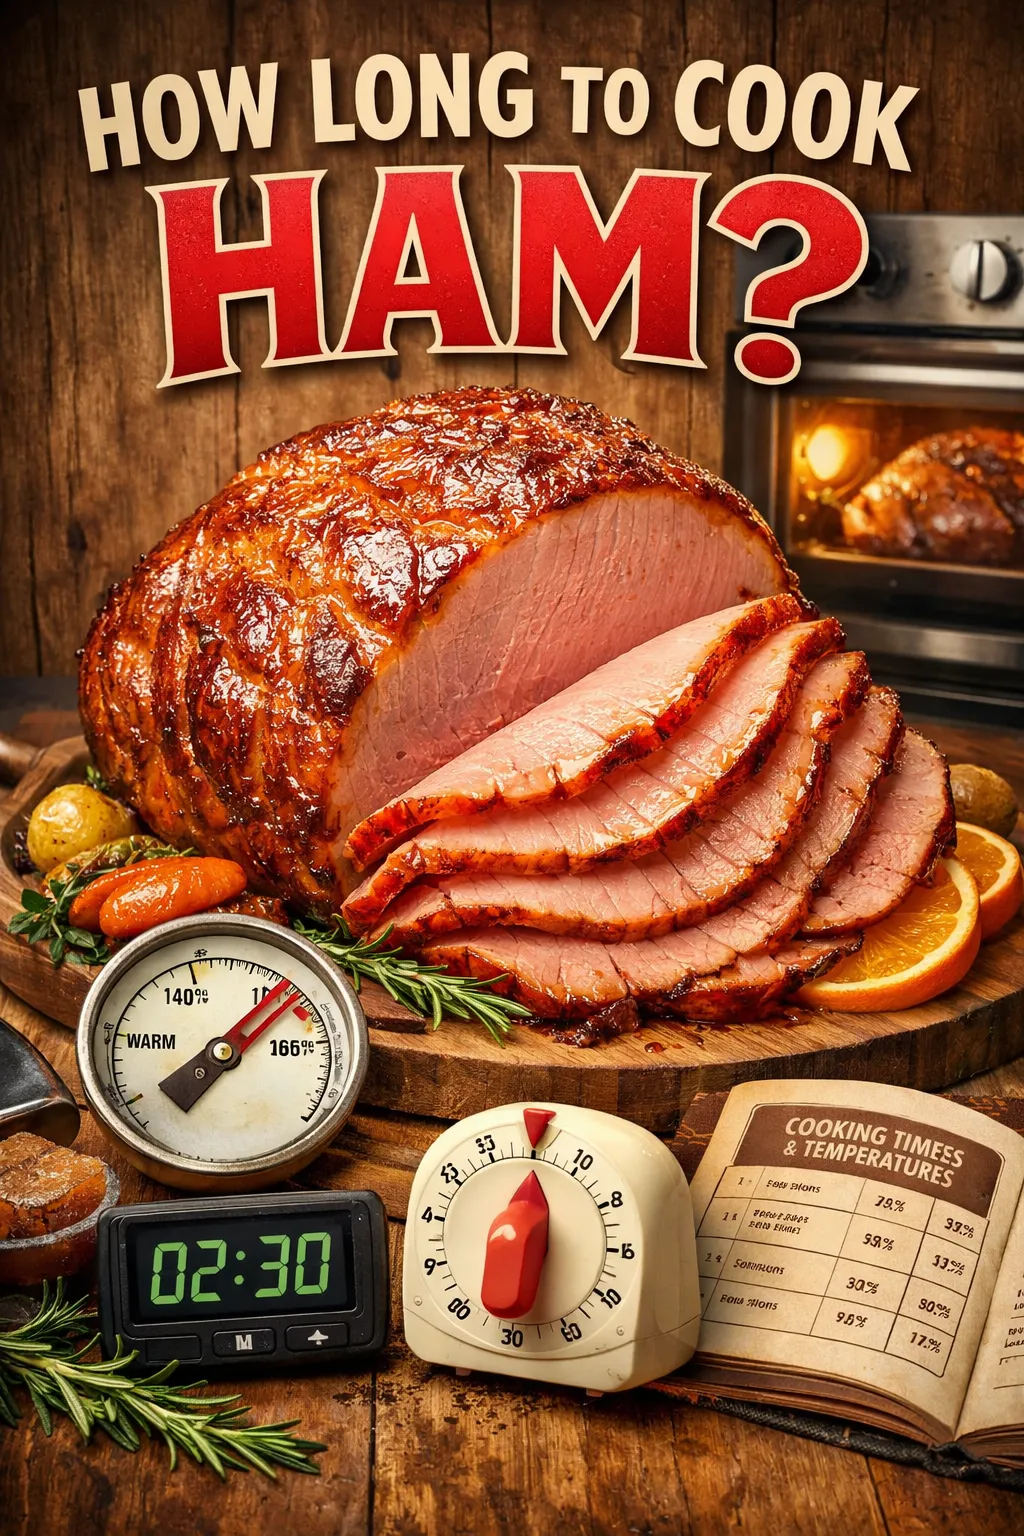

Cooking ham may feel intimidating, especially if you’re not sure how long to cook it. The required time varies on a few factors such as the cut of ham, its weight and the method used to cook it. With that knowledge, you can ensure your ham is perfect every time.
Types of Ham
Time varies with each of the different types of ham. Here are some common types:
Full Cooked Ham: This ham has been pre-heated to 140°F (60°C). All it requires is reheating, and often less time to do so.
Particularly halfway cooked or half baked: Hams like these are meant to be cooked and heated through to an internal temperature of 160 degrees F (71 degrees C). They take longer than fully cooked versions.
Raw Ham: This type of ham needs to be cooked to a temperature of 145°F (63°C), and allowed to rest for at least three minutes.
Weight Matters

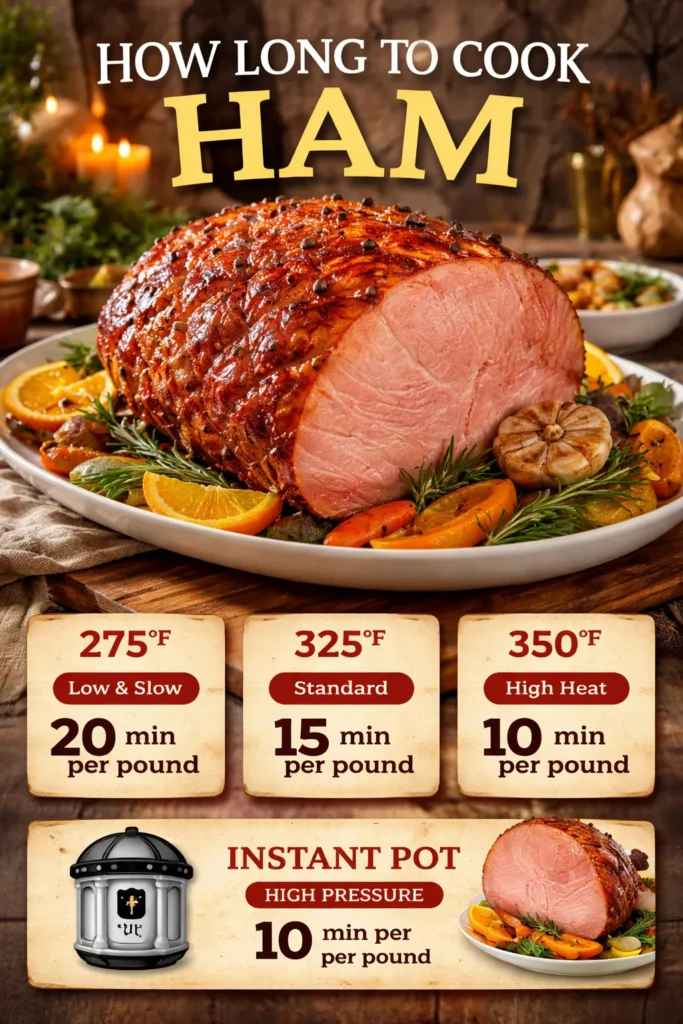
The size of the ham, or at least how much it weighs has a big part in how long you will want to cook it. As a general rule:
| Type of Ham | Cooking Time per Pound |
|---|---|
| Fully Cooked Ham | 10–15 minutes |
| Partially Cooked Ham | 18–20 minutes |
| Raw Ham | 20–25 minutes |
Cooking Methods
The technique you opt for will also govern cooking time. Here are common cooking methods:
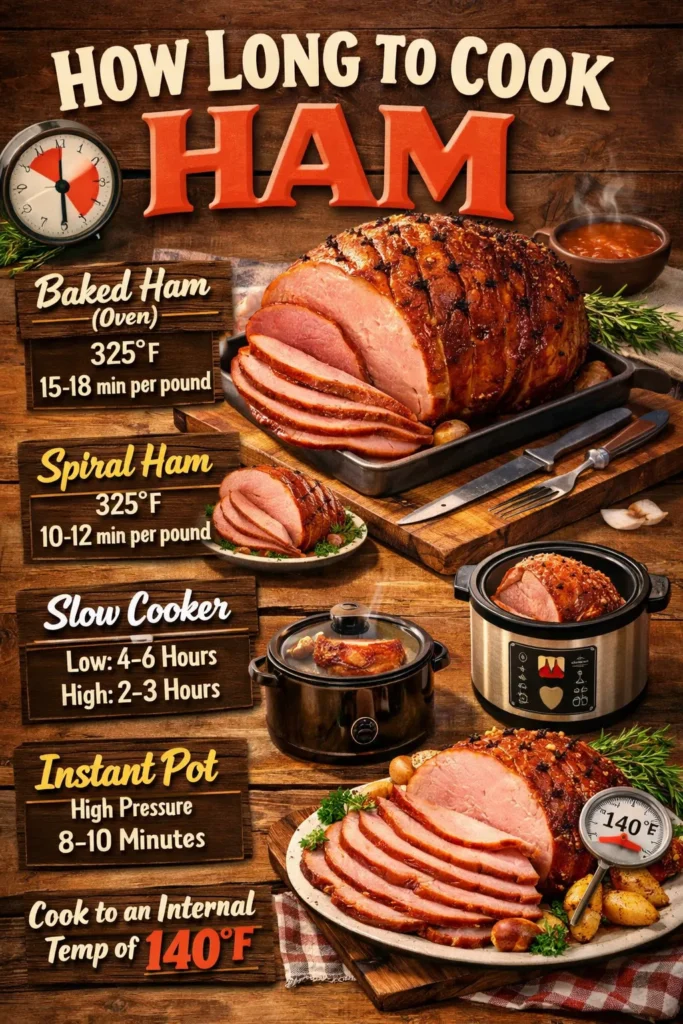
Oven Roasted: The most common way to bake a ham. Heat your oven to 325°F (163°C) and wrap the ham with foil. Bake for the weight instructions above.
Slow Cookin’: If you fancy, use a slow cooker for ease. About 6 to 8 hours on low, depending on the size of your ham.
Grilling: Ham can also be grilled over indirect heat, cooking it to your desired temperature.
Additional Considerations
How long do you cook ham for: SERVER IT this way!
Bone-In vs. Boneless: Specifically, bone-in hams can take longer because of the weight of the bone.
Glazing: If you will be glazing your ham, plan for more time. Glaze it during the last 30 minutes of cooking for best flavor.
Resting Period: Allow the ham to rest for at least 15 to 20 minutes after it’s cooked. This will enable to help keep moisture and taste.
Knowing about these factors will assist you in getting the best outcomes while cooking ham. Watch the temperature, and adjust cooking times based on the weight and nature of the ham.
For further information and some great tips on how to cook other meats including ham, you can check out FoodSafety. gov or National Hog Farmer.
Now that you know how to cook ham, your next family gathering or holiday will include a mouthwatering main course. Be sure to enjoy and add your favorite sides for a full meal!
Various Ham Cooking Methods – the Good with the Bad
How Long To Cook Ham
“How Long To Cook Ham?When it comes to cooking ham, you’re in for a real treat! There are so many different ways to cook this delicious dinner dish! Different cooking methods release different flavors and textures, which makes it important to know the ins-and-outs of various procedures. Here are some of them along with their corresponding pros and cons.
Oven Roasting
A traditional way to prepare ham is by oven roasting. It gives you a lovely caramelized crust that traps the juices in the meat.
Pros:
Ensures even cooking for fantastic flavor development.
Enables a satisfying crunch that many people desire.
Understands well with glazes.
Cons:
It is time consuming and if really large can potentially take several hours to 5-6 but the flavor is intense.
Takes some attention not to overcook.
Turning on the oven may consume energy.
Slow Cooking
Cooking ham in a slow cooker is great if you want to set it and forget it. This technique is believed to hold the flavors via meat for several hours.
Pros:
Easy meat to make and it is juicy and tasty.
Great for days when you are short on time, this recipe can be made in the morning and ready by dinner.
Attention to kitchen isn’t needed thanks to low-temperature cooking.
Cons:
Possibly doesn’t deliver an excellent crust but if needed put it in the oven and done.
Long cooking periods may involve some forethought.
May lose some textures versus roasting.
Grilling
Grilling ham is a not-so-typical way to prepare this popular meat, but it adds a delicious smoky taste that pairs well with the ham.
Pros:
The high heat of the grill produces gorgeous grill marks, and a smoky flavor.
Is accomplished in a shorter period of time than other methods.
Brilliant complement to any outdoor gathering, make your party special and eye catching.
Cons:
Needs vigilant temperature monitoring to prevent overcooking the meat.
You need to be skilled enough not to over-cook or burn your product.
Not for big hams if you don’t have the proper gear.
How Long To Cook Ham
Picking the correct ham variety for your meal can make or break your culinary experience. The confusion, the distinction with these various types will help you is easier! Today, we’ll be discussing various types of hams that are popularly used in cooking and baking, and examining what sets them apart from each other and how best to use them.
First, you need to distinguish between the two main kinds: fresh ham and cured ham. Fresh ham comes from the back leg of a pig and is not cured or preserved. On the other hand, cured ham has been preserved with salt, nitrates or other preservatives. Cured hams exist in a number of specifically named varieties:
City Ham: This is a wet-cured ham, which means it was brined, and then injected with that brine, so it’s salty and flavorful. City hams City ham, or wet-cured ham, is typically sold milder in flavor and coated with a glaze — popular in the holiday season –– often pre-cooked and just as easy to eat.
Country Ham: Country ham is dry-cured with salt, as opposed to city ham, which would be brined or wet cured. It is strongly flavored, and typically aged; it is frequently marketed uncooked. I find country ham to be a good fit with traditional Southern food.
31.Baked Ham: City ham that has been baked and glazed and is usually served warm. It is great for holiday sides because it is so sweet.
Spiral-Sliced Ham It’s the most convenient option, and a favorite of so many. With the pre-sliced pieces it makes serving so much easier and really cuts down on prep time. It’s frequently glazed for an extra measure of sweetness.
When deciding on the best ham for your meal, consider these things:
| Ham Variety | Flavor Profile | Best Uses | Cooking Time |
|---|---|---|---|
| City Ham | Salty & Savory | Holiday meals, sandwiches | Heated 10–15 minutes per pound |
| Country Ham | Intense & Rich | Southern dishes, breakfast | Varies; consult specific guidelines |
| Baked Ham | Sweet & Smoky | Holiday meals, gatherings | 10–15 minutes per pound |
| Spiral-Sliced Ham | Sweet & Savory | Quick meals, parties | 10–15 minutes per pound |
| Black Forest Ham | Smoky & Slightly Sweet | Sandwiches, breakfast dishes | Varies; check packaging |
Typically served cold
Knowing your Hams can even make a difference to your dining experience. If you’re cooking for an event or special occasion, think about the flavor profile and your overall dish theme. For example, a lush country ham will be the star at a Southern-theme party, while a spiral-sliced one (available from Honey Baked Ham) is perfect for buffet or everyday dining.
Moreover, consider the cooking techniques. Most hams, including cooked city or spiral-sliced ones, just need reheating; if anything, the country ham might require an extra few hours of cooking because it is older and more likely to have spent a longer time curing. Just be sure to follow the cook times so you don’t end up with an overcooked luke-warm mess of goodness. If preparing, a meat thermometer can be your guide to that perfect doneness (generally an internal temperature about 140°F for most pre-cooked hams).
Flavor boosts such as glazes can also kick the dish up a notch. It is common to use brown sugar, honey, and mustard in glazing. Because the glaze is applied later on, everything else has ample time to cook (and get super tender) without risk of burning it before serving.
The right sides can also help your ham elevate the meal. Classic side dishes like mashed potatoes, green beans, and cornbread complement the tastes in the ham. Not only are they nutritious, but they add colour and texture to the dish as well!
In conclusion Understanding the different types of ham and the way they can be cooked and served will ultimately enable you to make a conscientious selection when you purchasing your meal. Getting to know these hams is not only impressive and tasteful for your guests, but it also ensures long-lasting meals. Whether you’re throwing an all-out holiday bash or hosting a simple weekend family dinner, there’s a ham waiting for you.
How Long To Cook Ham
A good glaze for ham does wonders to its taste and it’s aesthetic, turning your piece of meat into the star dish. Here are some must know tips for creating a delicious glaze that is packed with flavor.
Choosing the Right Ingredients
Your glaze will only be as good as your ingredients. Popular additions to a delicious ham glaze Here are some popular ngredients when creating your delicious ham glaze:
Brown Sugar: The ubiquitous foundation for many a glaze, as it adds sweetness and caramelization.
Honey: For sweetness and depth of flavor… plus shine.
Mustard: There’s a bite that strikes and even out the sweet, and hold up flavor-wise.
Fruit Juices: Add pineapple, orange or apple juice to bring a fruity zestiness to the party.
Spices: Cloves, cinnamon or allspice can add warmth and depth.
Preparing the Glaze
Sure, mixing up your glaze is easy enough, but the combination of flavors is all important. Follow these steps:
On the stovetop, add together whatever combination floats your boat – let’s say sugar and honey.
Whisk in mustard or fruit juice until the mixture is smooth.
Stir gently over low heat until the sugar is dissolved, and slightly thickened.
When it is a little more individual pieces drip off on their own as the extra thickened liquid slips past, remove from heat and allow to cool slightly.
Applying the Glaze
The way you brush the glaze on your ham can make a big impact on how it turns out. Consider these techniques:
Score the Ham: Run a sharp knife over the surface in a diamond pattern, making shallow cuts. This lets the glaze penetrate for maximum flavor.
Brush on Generously: Apply the glaze generously with a basting brush all over the ham, making sure to get it down into the scored sections.
Another Basting: If you would like more glaze and a thicker coating on your ham, apply another basting to the ham every 30 minutes as it continues to cook.
Determining Timing
How to glaze: When it comes down to it, the timing of glazing is key. In general, your best bet is to glaze the ham:
In the final 30-45 minutes of cooking. I don’t want the sugars in the glaze to burn, but I do want them to caramelize.
If you have a spiral-cut ham, and just the outside is exposed to its glaze, all will be even in Hamville.
Cooking Temperature
In addition to time, the temperature at which you cook your glaze is key to how it sets. Cooking your ham at a lower, even temperature (about 325°F) ensures that it heats throughout and the glaze can adhere without burning.
Serving and Eating Your Glazed Ham
Once your ham is gorgeously glazed and cooked, let it rest for 15-20 minutes before carving. This aids in allowing the juices to redistribute, which is important for keeping your ham moist! At time of serving, drizzle that leftover glaze over the slices for extra yums.
| Pairing Suggestions | Notes |
|---|---|
| Roasted Vegetables | Keeps the meal light and nutritious |
| Potato Mash | Adds comfort and richness |
| Green Salads | Brings freshness and brightness to the meal |
Warmth and complexity
Follow all these easy tips to make the perfect glaze for your ham, a show-stopping main dish for your family and friends.
Cooking Ham: All You Need To Know Plus 19 Other Questions And Answers For Cooking The Perfect Ham
There isn’t a superlative paragraph to be written about cooking ham, at least not in terms of questions that need to be answered, or perhaps more accurately: questions you have but don’t know the answer to yet. Whether you’re making a ham for the holidays, or just something to enjoy with your family and friends in a cozy meal, it’s important to know how exactly to cook it so that you end up with a dish that’s delicious and safe to eat. So, here we’re covering some commonly asked questions to help whip your ham cooking adventure into smooth shape.
What Types of Ham are There?
The type of ham you are preparing is important to know because it determines the cooking time and method. Common types include:
Fresh Ham: This is a raw ham that requires cooking before being eaten.
Cured Ham: As you might guess, it is salted and cured. It is typically available fully cooked, ready to be reheated.
Spiral-Sliced Ham: This is the pre-sliced variety, and can be served warm or cold.
Bone-In Ham: This ham contains the bone which may lend flavor, but will require longer cooking.
Boneless Ham: They are also more manageable to carve and cook quicker than bone in hams.
How Long Do You Cook Ham?
Ham has different cooking times depending on whether it is pre-cooked and raw. Here is a timeline to keep in mind when cooking:
| Type of Ham | Cook Time per Pound |
|---|---|
| Fully Cooked, Bone-in | 10–14 minutes |
| Fully Cooked, Boneless | 12–15 minutes |
| Raw, Bone-in | 18–20 minutes |
| Raw, Boneless | 20–25 minutes |
Always be sure to use a meat thermometer! For precooked hams, the temperature should be 140°F (60°C). For uncured hams, 145°F (63°C) is the target.
Are You Supposed to Cover Ham When You Cook It?
Covering ham as you cook it can keep the moisture locked in so that the ham should be juicy and tender. If you like the glaze super-crispy, don’t cover the ham for the last 30 minutes of cooking time so that outside can brown.
What Do You Glaze Your Ham With?
Glaze with flavor A glaze can lend a new level of flavor and festive looks to your ham. Here are some popular glazes to consider:
Honey and Brown Sugar: Sweet with a hint of caramelization.
Maple Syrup: Provides a lush, woodsy sweetness.
Mustard Glaze Another tangy note. Meatloaf With Italian Sausage.
Pineapple Juice: For that traditional, fruity taste.
Can You Cook a Ham in an Oven, Slow Cooker or Pressure Cooker?
Yes! There are several ways you can cook a ham:
Oven: Best for an even cook and if you like a crispy glaze.
Crockpot: Ideal for when you want to infuse flavor or just have something cooking without having to stand over it.
Pressure Cooker: A quick way to keep ham super moist!
What to Serve with Ham?
As for the sides, there are countless options. Below are some favorites that complement ham beautifully:
Mashed Potatoes
Green Bean Casserole
Macaroni and Cheese
Roasted Brussels Sprouts
You can nurse a ham bone for another stock, or wedge it into your dutch oven as a dainty way to cure beans while roasting them with garlic confit and silvered onions — you’ll know where the schmaltz came from.
Ham isn’t as daunting as it seems. You’ll learn the cooking times, methods and flavors that will make your roasts not only a symbol, but also delicious centerpiece to any meal. So get out all your ingredients, find the right temperature for baking and feel that delicious smell that permeates through your kitchen!
Conclusion
How to Cook Ham Timing, preparation, and a good method can make all the difference when it comes cooking ham into an outstanding centerpiece for your meal. Knowing the length of time to cook ham is all well and good, but it ultimately depends on what kind of ham you’re dealing with—fresh vs. cured or smoked—and how you decide to cook that ham. Each method has its own advantages and disadvantages that can affect the flavor and texture of your dish, whether you’re baking them, grilling them or have them slowly cooking in a crock pot.
Picking out the perfect variety of ham is an important decision for your celebration. Understanding the variations among choices like spiral-sliced, bone-in or country hams can help you make a choice that’s right for your tastes and desired level of easy time. And once you have your ham — let’s not kid ourselves, its integral glaze has still to be discussed. When prepared correctly, that glaze can help to color your dish and provide an explosion of flavor that makes for a truly memorable ham.
Odds are, as you make your way through this process, you may have some questions. Those typical questions about how long to cook something or at what temperature and for how long it can be stored often have simple replies. If you’re an experienced cook or trying this out for the first time, pay attention to these tips to ensure that you end up with a delicious ham that will impress all of your friends and family.
Now that you’re in the know on these few crucial aspects, you can handle your ham with confidence. Appreciate with cooking, relish the end result and most of all: enjoy sharing your tasty ham with others!