
If you like to cook ribs, then cooking them in the oven can behow-to-cook-ribs-in-the-oven using pork or beef ribs, priming yourself on a few critical Essential Techniques for Cooking skills to the next level, especially if grilling outdoors isn’t possible. Let’s find out what are some procedures and ingredients that will enable you to prepare ribs in the oven like a pro.
Choosing the Right Ribs
When it comes to ribs, the type you select can affect cooking time and flavor. The main varieties are:
- Pork Ribs: Baby back ribs are tender and lean, while spare ribs are meatier and richer in flavor.
- Beef Ribs: These come from the shoulder or back and are known for their robust taste.
Preparing Your Ribs
Before cooking, proper preparation is key to achieving delicious ribs. Here are the steps you should follow:
- Remove the Membrane: Flip the ribs over and locate the thin membrane on the back. Use a butter knife to lift it, then grab it with a paper towel and pull it off. This will allow for better seasoning and tenderness.
- Season Your Ribs: Apply a dry rub or marinade to enhance flavor. Common ingredients for a dry rub include brown sugar, paprika, salt, pepper, and garlic powder. Make sure to coat both sides evenly.
- Resting Time: Allow the seasoned ribs to sit for at least 30 minutes at room temperature. For deeper flavor, refrigerate them overnight.
Cooking Techniques
Once your ribs are prepped, it’s time to cook them. Here are two essential techniques to achieve tender, mouthwatering ribs: low and slow, as well as the foil technique.
Low and Slow Method
This method involves cooking at a lower temperature over an extended period, ideal for tenderness.
Steps:
- Preheat your oven to 275°F (135°C).
- Place the ribs on a baking sheet lined with aluminum foil for easier cleanup.
- Cook the ribs uncovered for about 2.5 to 3 hours, flipping them halfway through.
- Optionally, brush your ribs with BBQ sauce in the last 30 minutes of cooking for a glaze effect.
The Foil Technique
Wrapping the ribs in foil retains moisture and speeds up the cooking process.
Steps:
- Preheat your oven to 300°F (150°C).
- Wrap the seasoned ribs tightly in aluminum foil, sealing all edges to prevent steam from escaping.
- Place the foil-wrapped ribs on a baking sheet and cook for about 2 hours.
- After two hours, unwrap the foil and apply your favorite BBQ sauce.
- Return the ribs to the oven, uncovered, for an additional 30 minutes to allow the sauce to caramelize.
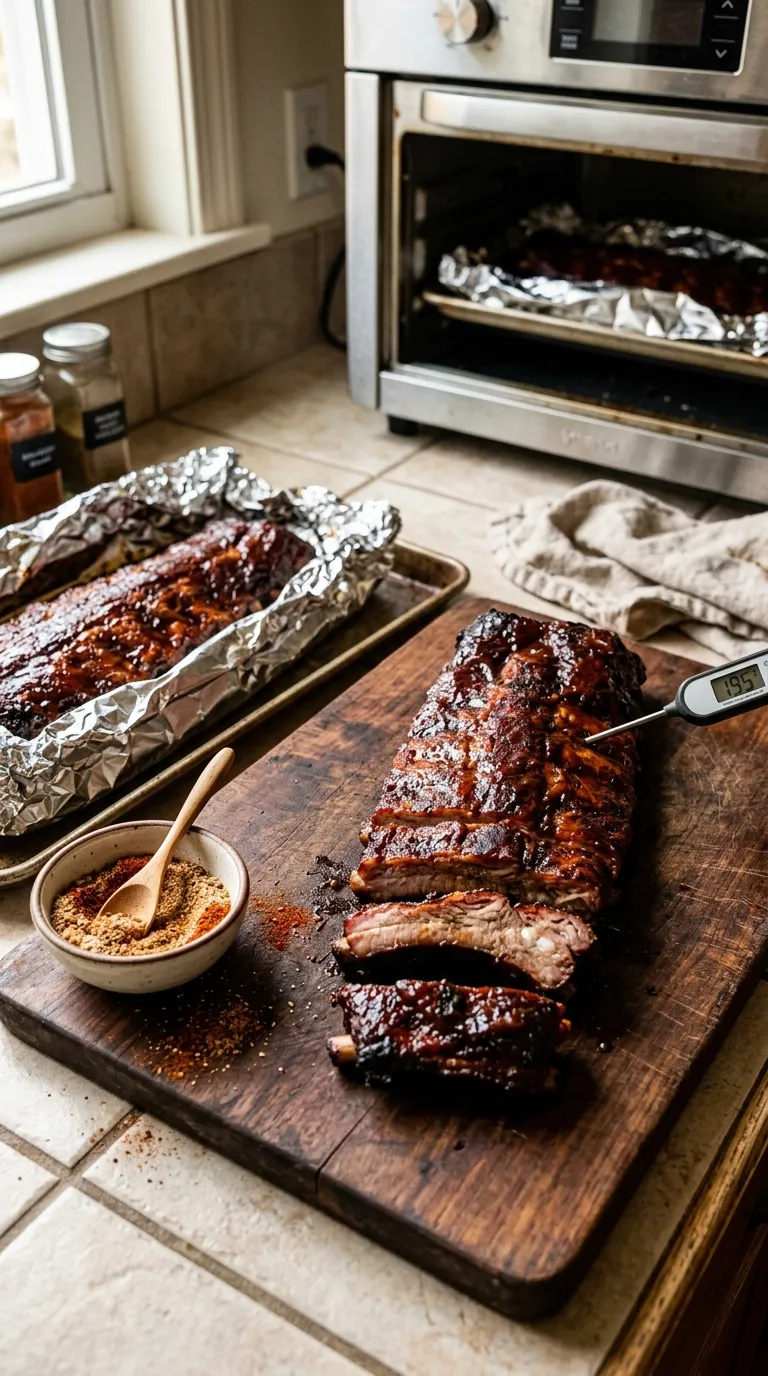
Finishing Touches
Once cooked, you should allow the ribs to rest for 10 or 15 minutes before cutting. This helps redistribute the juices throughout the meat for the best flavor and tenderness possible. When ready to serve, cut between the bones into individual ribs.
Additional Tips
To ensure the best result, consider these extra tips:
- Use a meat thermometer: Ensure that your ribs reach an internal temperature of at least 190°F (88°C) for the best texture.
- Experiment with flavors: Don’t hesitate to try different rubs or marinades. Smoky, sweet, or spicy blends can enhance the flavor profile of your ribs.
- Serve with sides: Ribs pair well with coleslaw, cornbread, or baked beans for a complete meal.
The cut of ribs you choose will always affect the outcome, and this holds true for ribs cooked in the oven. There are a number of options when it comes to cuts, and with the different types come unique textures and flavors that must be considered. Let’s look at the rib cuts you can choose from for your oven cooking adventure.
Choosing the Right Cut of Ribs for Oven Cooking
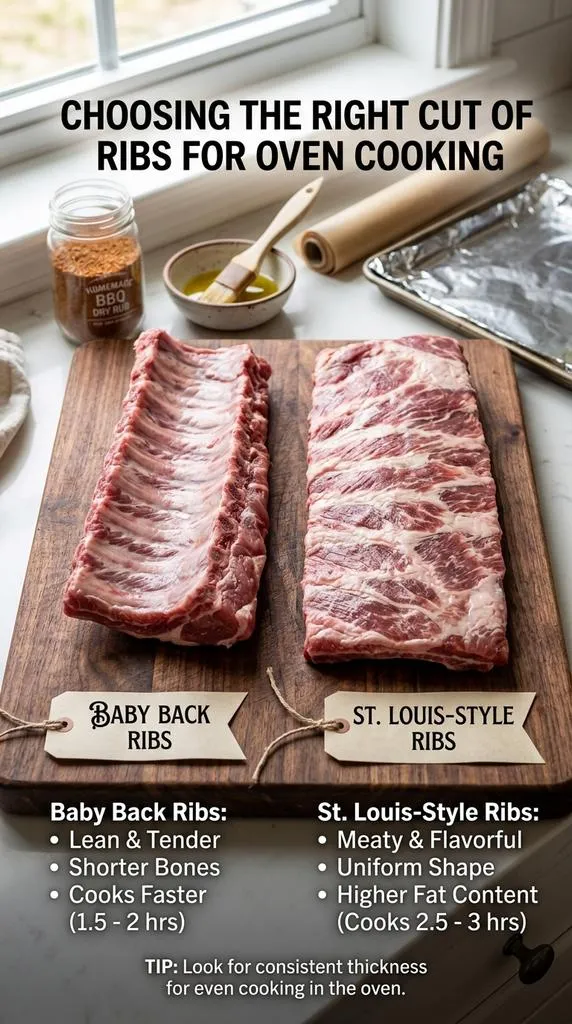
Baby back ribs are great for people who prefer a milder flavor and more tender meat. They take less time to cook, so they’re a good choice if you want something fast and filling. Season with salt and pepper only, or go big by using your favorite barbeque sauce for added flavor.
Types of Ribs
There are several types of ribs, each with distinct characteristics. Here’s a quick breakdown:
- Baby Back Ribs: These are smaller, leaner ribs that come from the top part of the pig’s ribcage. They are tender and have a sweet flavor, making them a popular choice for many.
- Spare Ribs: Spare ribs are larger and meatier, coming from the belly of the pig. They have a richer flavor due to their higher fat content and are often cooked longer to make them tender.
- St. Louis Style Ribs: A subset of spare ribs, St. Louis style ribs are trimmed to have a rectangular shape, removing the rib tips. This cut has an excellent balance of meat and fat, which makes it great for oven cooking.
- Country-Style Ribs: These aren’t technically ribs but rather cuts from the shoulder. They are meatier and require different cooking techniques but can be delicious when properly cooked.
Factors to Consider When Choosing Ribs
Choosing the right cut of ribs for your cooking style is not just about preference; it’s also about how much time you’re willing to invest. Here are some factors to consider:
| Type of Rib | Tenderness | Flavor | Cooking Time |
|---|---|---|---|
| Baby Back Ribs | Tender | Sweet | 2.5 – 3 hours |
| Spare Ribs | Meaty | Rich | 3 – 4 hours |
| St. Louis Style Ribs | Meaty | Balanced | 3 – 4 hours |
| Country-Style Ribs | Very Tender | Rich | 2 – 3 hours |
Why Choose Baby Back Ribs?
If you’re in the mood, spare ribs have a stronger flavor. Because they have a higher fat content, they tend to be more forgiving about cooking times. They will be both flavor packed and tender, as long as you give them enough time to cook down. Sliced spare ribs, served with a tangy sauce for an explosion of flavor.
Why Choose Spare Ribs?
St. Louis style ribs are perfect for someone looking for a little bit of both the tenderness of baby back ribs and the high meat content of spare ribs. Their painstaking trimming saves you prep time. They work without making a lot of mess and are great for cooking in the oven, where they will yield an evenly cooked rack.
Why Choose St. Louis Style Ribs?
If you like more meat and less bone, choose country-style ribs. They also lend themselves easily to different methods of cooking, especially baking in the oven. Their flavor profile is so rich that you can prepare them with nearly any marinade or rub and they’re still delicious.
Why Choose Country-Style Ribs?
When it comes down to what the best cut of ribs is for cooking in the oven, only you can decide based on your own tastes, techniques and time constraints. Regardless of the ribs you decide on, be sure to season generously and give ample time for cooking so that the flavor penetrates and the meat is tender.
For more advice and recipes, see Food Network or Serious Eats, which both offer great insight into cooking ribs.
For more tips and recipes, visit Food Network or check out Serious Eats, which offer wonderful insights into cooking ribs.
Flavor Enhancements: Marinades and Rubs for Oven-Cooked Ribs
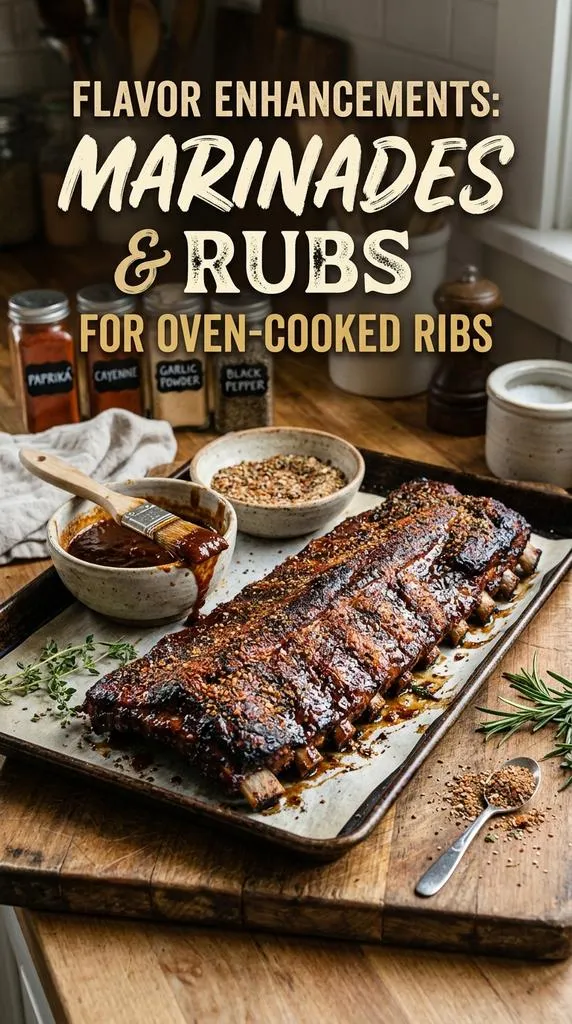
Cooking ribs in the oven can yield delicious results when paired with the right marinades and rubs. Utilizing these flavor enhancements enhances the taste of the meat and can turn a simple family dinner into a mouth-watering feast. Here’s how you can elevate your oven-cooked ribs with some easy and effective marinades and rubs.
Understanding Marinades
Use marinades and rubs that will complement your ribs, and you can get delicious cooking results by using the oven. Using these flavor enhancements improves the taste of meat and may create a reader family dinner into a mouth-watering feast. Here’s how you can kick up your oven-cooked ribs with a few simple but impact-heavy marinades and rubs.
- Base: Use 1 part acid (like apple cider vinegar or lemon juice) to 3 parts oil (such as olive oil).
- Flavorings: Add herbs, spices, garlic, or onion for more flavor.
- Sweetener: Consider adding a bit of honey or brown sugar for a hint of sweetness.
Marinades are blends generally made with an acid, oil and spices. They help break down connective tissue and also season your ribs. The acidic components of marinades, like vinegar or citrus juice, help dissolve the proteins in meat to relax it and change its flavor and texture. Here’s a quick rundown on how to make a basic marinade:
Popular Marinade Recipes
Here are a couple of recipes to inspire you:
| Marinade Name | Ingredients | Marinating Time |
|---|---|---|
| BBQ Sweet Marinade | 1 cup BBQ sauce, 1/4 cup apple cider vinegar, 2 tablespoons honey | 4-6 hours |
| Spicy Garlic Marinade | 1/4 cup soy sauce, 1/4 cup olive oil, 1 tablespoon minced garlic, 1 teaspoon red pepper flakes | 2-4 hours |
Exploring Rubs
If allowed to marinate for a few hours or overnight, this combination can do wonders on your ribs. Don’t forget to put the ribs in a resealable bag or nonmetal container, then coat them evenly. Seal the bag and allow the marinade to work its magic in the refrigerator.
- Brown Sugar: For sweetness and caramelization.
- Paprika: Adds color and a mild spice.
- Garlic Powder: For savory flavor.
- Salt and Pepper: Essential for seasoning.
- Cayenne Pepper: For a touch of heat.
Rubs are the blend of dry spices and herbs that forms a crust on the ribs as they cook. Rubs don’t need that time to soak up moisture, as marinades do, so they’re a faster flavor. A good rub can amplify the meat’s natural flavors and add depth. A simple rib rub usually contains:
Popular Rub Recipes
Here are some easy rubs to try:
| Rub Name | Ingredients |
|---|---|
| Classic BBQ Rub | 1/2 cup brown sugar, 1/4 cup paprika, 2 tablespoons chili powder, 1 tablespoon black pepper, 1 tablespoon salt |
| Herb-Spice Rub | 1/4 cup rosemary, 1/4 cup thyme, 1 tablespoon garlic powder, 1 tablespoon onion powder, 1 tablespoon olive oil |
Cooking Your Ribs
Mix the above ingredients in equal parts into a bowl. Rub this blend generously over the ribs before cooking. Let the rub sit at a minimum of 30 minutes to an hour before putting in the oven.
After marinating or using your rub, preheat your oven to 300°F (150°C). Put the ribs on a baking sheet lined with foil for easy cleanup. Wrap in foil to keep them moist and bake for about 2.5 to 3 hours. They’re finished off under the broiler for a few minutes at the end to char up nicely and deepen those flavors.
You can create ribs to satisfy your palate by playing around with marinades and rubs, even if cooking them in a oven. Whether you prefer yours sweet, spicy or savory, the perfect combination of flavors can make each bite sing.
Step-by-Step Guide to Perfectly Baking Ribs
Oven-baked ribs can be delicious, tender and juicy. Using the proper techniques, you can have fall-off-the-bone ribs that will wow your friends and family. With this step-by-step guide, the best baked ribs that are jam-packed with flavor and moisture.
Choosing the Right Ribs
When selecting ribs, there are a few options to consider:
- Baby Back Ribs: These ribs are shorter and leaner with a mild flavor, perfect for quick cooking.
- Spare Ribs: Larger and fattier than baby back ribs, these offer a robust flavor and require longer cooking times.
- St. Louis Style Ribs: A cut from spare ribs, these are trimmed into a rectangular shape, providing a uniform cooking surface.
Choose according to your taste preference and the time you have for cooking.
Ingredients You Will Need
Ensure you have the following ingredients ready:
- Ribs (your choice: baby back, spare, or St. Louis)
- Your favorite dry rub or marinade
- Barbecue sauce (optional, for glazing)
- Aluminum foil
- A baking dish or sheet
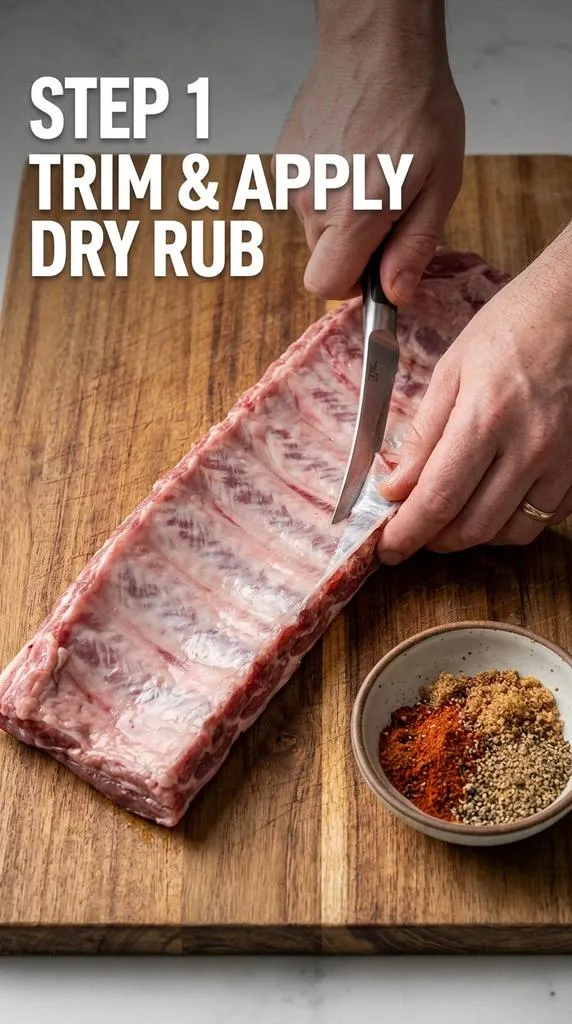
Preparing the Ribs
Start by preparing your ribs for cooking. Here’s how:
- Remove the Membrane: Flip the ribs so the bone side is up. Use a knife to lift one corner of the tough membrane covering the bones. Grab it with a paper towel and pull it off completely for more tender ribs.
- Apply the Dry Rub: Sprinkle your dry rub generously over both sides of the ribs. Rub it in well to enhance the flavor. If using a marinade, let the ribs soak for at least an hour, or overnight for maximum flavor.
Baking the Ribs
Now that your ribs are prepped, it’s time to bake them in the oven:
- Preheat Your Oven: Set your oven to 300°F (150°C). This low and slow cooking method will ensure juicy ribs.
- Wrap the Ribs: Place the ribs on a baking sheet. Cover them tightly with aluminum foil. This will trap moisture, keeping the ribs tender during cooking.
- Bake Them: Put the covered ribs in the preheated oven. Bake for approximately 2.5 to 3 hours. Check for tenderness; the meat should start pulling away from the bones.
Finishing Touches
For that perfect glaze, follow these steps after the ribs are tender:
- Brush with Barbecue Sauce: Remove the ribs from the oven and carefully unwrap the foil. Brush a layer of barbecue sauce over the top.
- Broil for Crispy Edges: Set your oven to broil. Place the ribs back in the oven under the broiler for about 5-10 minutes, watching closely to prevent burning.
Serving Suggestions
Allow ribs to rest a few minutes after broiling and cut between bones to serve. Serve with coleslaw, baked beans or cornbread and you have a barbecue feast. Don’t forget the extra barbecue sauce for dipping!
Additional Tips for Perfect Ribs
- Experiment with different rubs and marinades to find your favorite flavor.
- Try wrapping the ribs with brown sugar or honey for added sweetness before baking.
- Adjust the baking time depending on the thickness of the ribs.
If you’re a devotee of barbecue, read on for more tricks and lessons at Serious Eats or up your game with tips from Bon Appétit.
Now that you have this guide, get cooking, and enjoy the delightful experience of perfectly baked ribs right from your oven!
Common Mistakes to Avoid When Cooking Ribs in the Oven
Oven-cooking ribs can be some of the most enjoyable food you can prepare, but there are a lot of common mistakes that can ruin it. By avoiding these pitfalls, you can have tender, juicy and flavorful ribs that will stand up to any barbecue in the backyard. Here’s what you need to remember when it comes time for cooking your ribs in the oven.
1. Not Removing the Membrane
Among all the aspects of rib prep, perhaps none is more frequently neglected than the membrane. This thin membrane that sits on the bone side of the ribs toughens up and becomes chewy when cooked. You want to peel this membrane off before seasoning, as it will help your flavors work their way in better while cooking.
2. Skipping the Seasoning
Ribs need seasoning to build flavor. This would generally go with simple salt and pepper on the ribs, but that may not be enough. Try making a dry rub (a mix of paprika, garlic powder, onion powder and a little brown sugar). Leaving rib well seasoned with a delicious crust to imparting flavor.
3. Cooking at Too High a Temperature
Another common misconception is that you will cook ribs faster at a high temperature. Although it may facilitate the cooking process, it usually produces dry and tough meat. A low and slow approach will yield juicy, tender ribs. Ribs cooked at about 275°F will break down the connective tissue, yielding tender ribs.
4. Ignoring the Cooking Time
There isn’t an exact science to cooking ribs in the oven, and multiple factors can affect the cooking time, such as whether the ribs are thin or thick cut and your oven calibration. Spare ribs typically need about 2.5 to 3 hours on average, while baby back ribs will take about 2 to 2.5 hours. Always check for doneness before taking them out of the oven.
5. Not Using Foil
Covering the ribs with foil while they cook can steam the meat and keep it moist. Tightly wrapping them creates a mini-oven effect, so that the ribs cook evenly. After a couple of hours, you can peel off the foil and apply some sauce for the last half hour to get that nice sticky glaze.
6. Overbasting with Sauce
It’s easy to slather ribs with sauce early in cooking, but over basting can result in burnt sauce and less than great flavor. Rather, add the sauce in the last 30 minutes to an hour of cooking. Doing it this way allows the sauce to caramelize but not burn, and brings out a flavor profile of the ribs.
7. Not Letting the Ribs Rest
After cooking, resting the ribs for at least 10-15 minutes is essential. Allowing the fish to rest redistributes the juices so every bite is juicy and flavorful. If you cut into the ribs before they’re done cooking, you’ll lose a lot of moisture and flavor.
8. Using the Wrong Ribs
Cooking methods and times vary between rib types. If you’re using baby back ribs, which tend to cook faster than spare ribs, adjust according to that cut’s per-pound cooking guidelines. Understanding the type of rib you’re working with is critical for great results.
9. Not Monitoring Internal Temperature
A meat thermometer is the rib cook’s best friend. The safe internal temperature for pork ribs is around 190°F to 203°F, when the connective tissue has broken down enough to make them fall-off-the-bone tender without turning mushy.
10. Failing to Experiment with Flavors
Cooking is an art, and ribs are a medium for painting. Feel free to experiment with different spice blends, marinades or sauces. You may find some awesome flavor combos to suit your taste. But exploring flavor profiles would take your ribs to the next level. Read more recipes and tips at Food Network or Epicurious.
If you can avoid these common mistakes, you can get amazing results from cooking ribs in the oven. The trick is to be patient, add salt and pepper and pay mind to cooking times. You will soon be feasting on perfectly cooked, fork tender ribs that would impress your family and guests. Happy cooking!
Conclusion
This makes it possible to prepare delicious and tender meals that are loved by all with flavorful ribs cooked generously. With just a few key techniques, you, too, can get the texture and flavor that would make your mouth water. Choosing the appropriate cut of ribs, everyone from baby back to spare and St. Louis style, is crucial to developing your dish. Knowing your options is key because they each have different cooking times and methods.
When it comes to ribs, flavor is everything, and that’s where marinades and dry rubs have their greatest effect. From sweet and smoky to spicy and tangy, the ideal seasoning can take a dish to the next level. Keep in mind that a good marinade will help to flavor the meat and tenderizes it making each bite a pleasure.
Step-by-step guides do not let you miss anything important on how to bake ribs perfectly. Success comes down to keeping the oven at the right temp, figuring how long to cook and allowing for a rest after baking. It’s also key to watch out for oopses — undercooking or overcooking, in particular — that can ruin your work.
The knowledge you have gained within this article has provided you with the tools to become a rib cooking master. Cooking ribs in the oven is a fun but rewarding process, whether you’re preparing for a family dinner or an event. So start collecting your spices, preheat your toaster for a glowing barbeque promising and enjoy the cooking process like you’ve never tried before!