
One of the joys of cooking ham is timing it perfectly. The best ham cooking time is very dependent upon the type of ham and its size. Here’s what you need to do to make sure your ham is cooked well.
There are two basic classes of ham: fresh (uncooked) and cured (smoked or precooked). Each has its own cooking needs. You must understand these factors so that you can figure out the right cooking time.
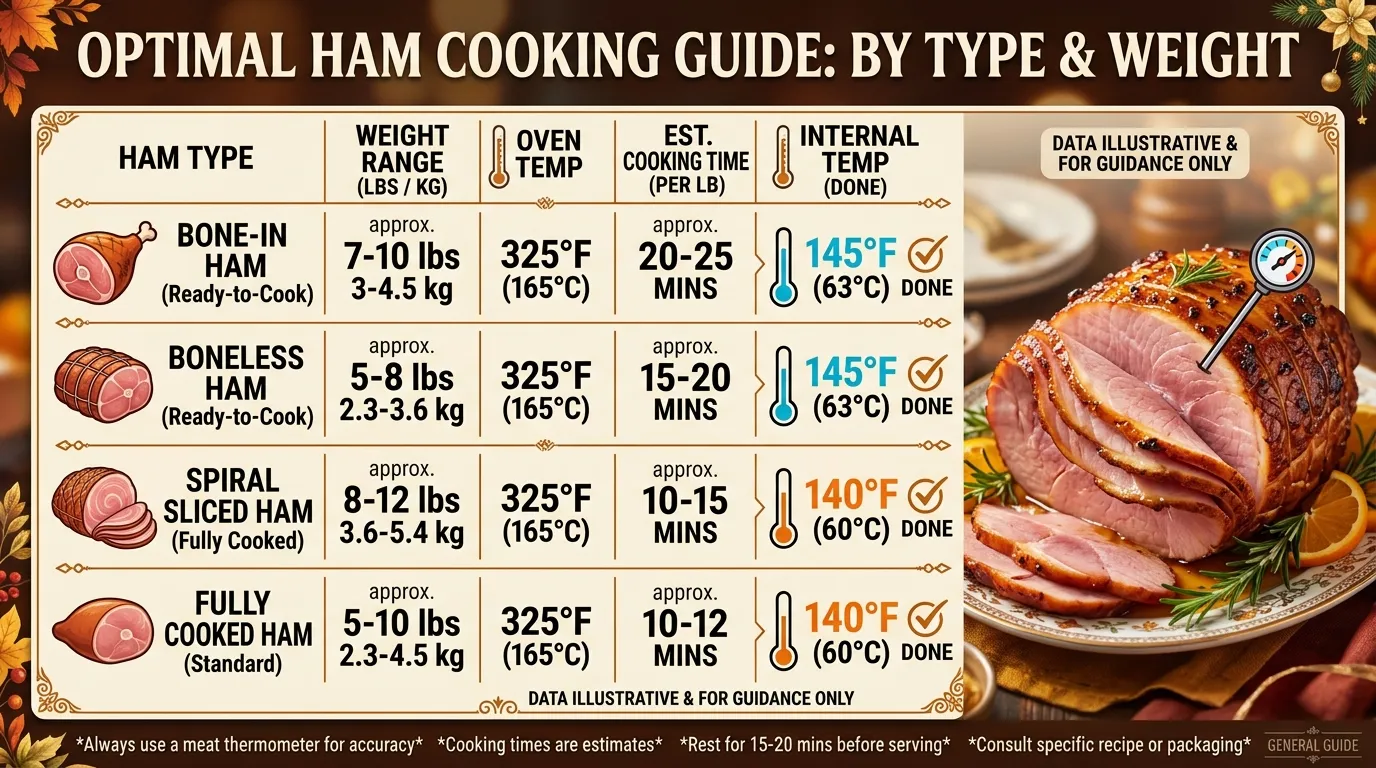
Here are some general guidelines for cooking hams:
Ham Cooking Times by Type
Fresh Ham: This kind of ham needs to be cooked all the way through. (At 325°F [163°C] the cooking time is about 18 to 20 minutes per pound.)
Cured Ham: Cured ham can be half-cooked or fully cooked:
Fully Cooked (Pre-cooked) Ham: Reheat, about 10 to 12 minutes per pound.
Uncooked Cured Ham: Cook for 18 to 20 minutes a pound.
Glazed Ham: When making a glazed ham, glaze during the last 30 to 45 minutes of cooking.
Weight-Based Cooking Table
Weight of Ham (lbs)Cooking Time (minutes per lb)Total Cooking Time (hrs)5201.5101953018.015184.520165.3
Keep in mind that perfecting the ham isn’t only about timing; making sure you hit the safe internal number is key. The USDA states that cooked ham should be heated up to an internal temperature of at least 140°F (60°C) when reheating, and fresh ham to at least 145°F (63°C).
Tools for Accurate Cooking
The appropriate tools can make a huge difference in your ham cooking experience:
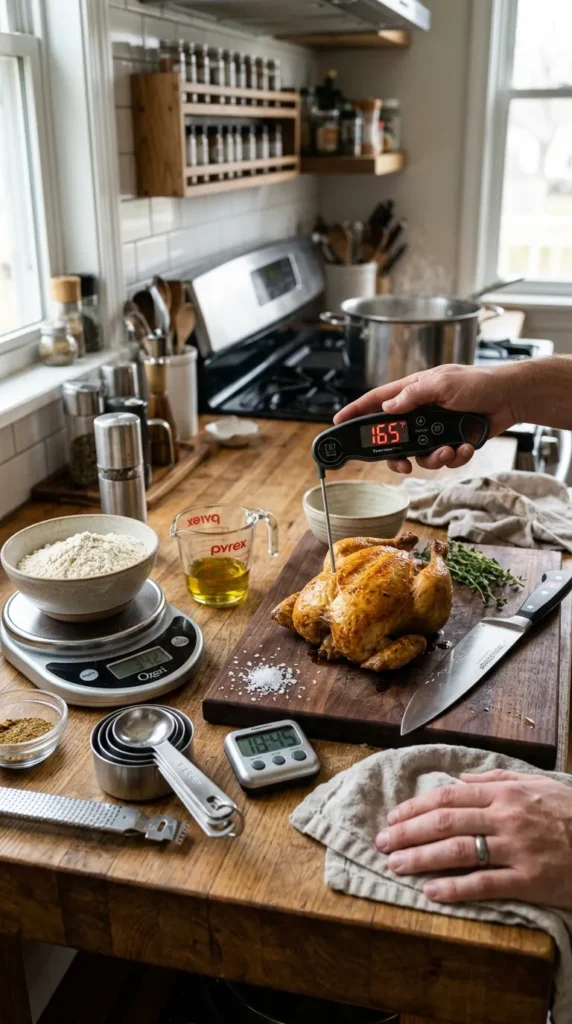
Meat Thermometer: This is the best way to know if your ham’s safe to serve. Insert the probe into the thickest side of the meat avoiding bone.
Aluminum Foil: Wrapping your ham in foil will keep it from drying out while cooking.
Roasting Pan: A deep roasting pan will catch juices and also help keep your ham moist as it cooks.
For additional information on ham cooking times, try FoodSafety. gov for more information about cooking food safely.
After you cook your ham, allow it to rest for at least 20 minutes before slicing. Doing so lets the juices redistribute and means a moist, flavorful presentation.
There are variations in cooking ham based on preparations. For a spiral-cut ham, it can take less time to warm up because of the slicing. Typically, plan on about 10 minutes per pound for a spiral-cut ham to be done. Again, make sure it has attained the target internal temperature of 140°F (60°C) before serving.
Using different flavor profiles with glazes and marinades can really elevate your ham. Popular glazes include honey, brown sugar and maple syrup, paired with mustard or spices for additional punch.
Don’t be afraid to ask for advice or recipes online. Websites like AllRecipes offer tools that can optimize the cooking time and taste to cater to your family’s needs.
Ham Cooking Time: Understanding Type and Weight is the way to go. As always, use proper tools and seek the correct internal temperature for a successful meal. With the right preparation, ham is an impressive centerpiece for any dinner table.
Science of Cooking Ham: What Makes it Juicy
Ham Cooking Time
A few rules to live by will help bring the ham of your dreams into the world, all juicy, tender and full of flavor. There’s a science to the cooking method, temperature and timing that puts it all together for the perfect dish.
The Importance of Cooking Time
Ham cooking time is based on the kind of ham. There are two kinds of ham, usually: precooked and raw. Pre-cooked hams need only be reheated; raw hams must be cooked all the way through. Here’s a quick guide to cooking times:
Type of HamCooking MethodEstimated Cooking TimePre-cooked HamBake 325°F10-14 min. per poundRaw hamCook to internal temp of 145°F20-25 minutes per pound
The Role of Temperature
Temperature is the critical detail in cooking ham. Ham is best at an internal temperature of 145°F (63°C). A meat thermometer will provide an accurate reading. This temperature ensures the meat is cooked through yet juicy. Cooking ham at lower temperatures could dry out the meat.
Methods for Cooking Ham
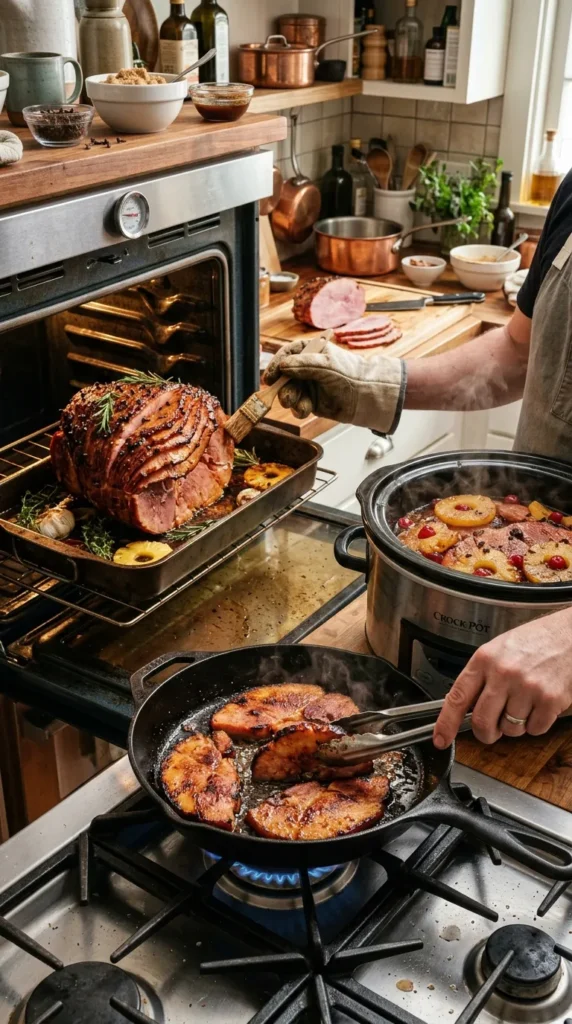
There are many different ways to cook ham, all of which yield a slightly different flavor and texture. Here are some popular methods:
Cooking Method: Baking: The most common method, baking allows the ham to develop a lovely crust. Reserving moisture, put some water and the ham in a roasting pan.
Glazing: For flavor and sweetness, apply a glaze in the final 30 minutes of baking. Typical glaze components are brown sugar, honey, and mustard.
Slow Cooking: Since you want to cook ham low and slow, a slow cooker is perfect for the job. There’s a hands-off approach here that makes it easy to prepare.
Grilling: Grilling could be another great option for a smoky flavor. The trick is to use a low flame and cook gently, so the outside doesn’t char before the inside is dry.
Enhancing Flavor and Moisture
And for the ideal juiciness, brine it prior to cooking. A brine can be as simple as water, salt and sugar. This soaking in the seasoning mixture allows the meat to absorb moisture and flavors, resulting in a tender dish. You can also use spices like cloves or cinnamon when cooking to boost the flavour.
Resting the Ham
After cooking the ham, remember to let it rest. Finally, we let the meat sit for 15-20 minutes so that the juices redistribute throughout the meat (so that they don’t run all over when you cut into them). Loosely cover the ham with foil for warmth during this period.
Common Mistakes to Avoid
In fact, there are a handful of mistakes to avoid for a perfectly cooked ham:
Thermometer is a Must: The thermometer is your best bet for precision.
Overcooking: Be mindful of cooking time, so the ham does not dry out.
Neglecting Rest: Let the ham rest before serving.
Ham is easy to cook and rewarding once you know the science behind it. Knowing cooking times, temperatures and methods can help you execute the feast of your dreams.
To read about cooking tips and techniques, please visit Food Network or Allrecipes.
How to Know When Your Ham Is Done: Internal Temperatures
Ham Cooking Time
Cooking ham can be a culinary art that confounds cooks at all levels. A very common question is how to tell when your ham is fully cooked and safe to eat. Making sure you’re cooking your ham to the right internal temperature is important for food safety and the overall flavor of your dish.
Safe minimum cooking temperatures for different kinds of meat are given by the U.S. Department of Agriculture (USDA) Internal temperature: For ham, the internal temperature varies depending on if you have a fresh ham or a pre-cooked one. Knowing these distinctions enables you to decypher whether you’re undercooking or overcooking your ham, keeping it juicy, flavorful and safe to eat.
Types of Ham and Their Instructional Temperatures
Hams are generally divided into two categories, fresh and cured. Each has its cooking time guidelines.
Fresh Ham: This is uncured ham requiring cooking to an internal temperature of 145°F (63°C). Best to let it rest on its own for at least 3 minutes after taking off the heat.
Cured Ham: If you’re using a cured or smoked ham, cooking it is a different process. For cooked or smoked hams (which have already been cured), you need to heat them to an internal temperature of 140°F (60°C) If you are cooking a whole, uncooked cured ham, bring it to an internal temperature of 145°F (63°C).
How to Measure Internal Temperature
For properly checking the internal temperature of your ham, a meat thermometer is very important. It helps you to dodge the guesswork pitfalls. Here’s how to use it:
Place the thermometer in the thickest part of the ham, avoiding bones.
Wait for the reading to stabilize, usually after around 10 seconds.
Make sure your temperature is compared to the safe minimum temperatures listed above.
Cooking Times for Various Cuts of Ham
The manner in which you cook it will vary based on the cut of ham you use. Here’s a simple table to show suggested cooking times according to the type of ham:
Type of HamWeight (lbs)Cooking Time (Per Pound)Fresh Ham8-1024-26 minCooked Ham (Whole)10-1415-18 minCooked Ham (Half)5-718-24 minBaked Ham (Bone-In)10-1415-18 min
These times may vary according to your oven’s particular performance and the ham’s temperature before cooking. A good rule of thumb is to start checking the internal temperature about an hour before the recommended cooking time, so you don’t overcook it.
Other Tips to Make Sure Your Ham is Done
Cooking ham to the proper temperature is elemental, but there are other things to consider:
Resting time: Always let the ham rest after you take it out of the oven. This allows the juices to redistribute, resulting in a moist meal.
One other factor for use of foil: Wrapping the ham in foil as it cooks can keep moisture in and also help distribute heat evenly.
Glazes: If you are using a glaze, brush it on in the last 30 minutes of cooking to prevent burning.
You should now be halfway prepared to cook a proper ham that is both safe and tasty. For more specific ham cooking techniques and recipes, go to FoodSafety. gov or IncredibleHam. com. These sites offer detailed information on how to cook ham and other meats safely.
Gilding Tricks: Flavor Building While Cooking Ham
Ham Cooking Time
If glazes excite you, make sure to try out some inventive new ham flavors; cooking ham can be delightful. An extra layer of flavor and texture, glaze turns a humdrum ham into the star attraction. Here’s everything you need to know about glazing techniques for your next ham.
Why Glaze Ham?
There are several purposes that glazing serves when it comes to cooking ham:
Flavor Enhancer: If you use a glaze, a good one will add sweetness and/or tangy and/or spicy notes to the ham that will enhance its flavor.
Aesthetic Appeal: Glazes yield a shiny exterior, making the dish aesthetically pleasing on the plate.
Moisture-Sealing: Glazes act somewhat like a seal while the meat cooks; locking in moisture that gives your ham its tenderness.
Popular Glaze Ingredients
Lush or Fruity — When picking a glaze, think about combinations that will play nicely with the ham’s savory profile:
Flavor BaseSweetenerAcidMustard or HoneyBrown Sugar or Maple SyrupPineapple Juice or Apple Cider VinegarBarbecue SauceHoneyLemon JuiceSpicesAgave NectarBalsamic Vinegar
Mixing these ingredients can provide you with a special glaze. You can play with flavors that you like.
Common Glazing Techniques
There are several techniques you can use to glaze your ham:
Brush With a Brush: With just a pastry brush you can add glaze near the end of cooking. Brush every 20-30 minutes to build flavor layers.
Glaze and Bake: Once the initial cooking time is done, crank up the heat, slather on that glaze and bake until caramelized.
Broil: If you want to finish your ham in a hurry, glaze it and put it under the broiler for a few minutes (watching closely so it doesn’t burn).
Timing Your Glaze
When to glaze can make the difference between great results and, well, not. Here’s a quick reference for when to glaze your ham, based on how long you plan to cook it:
Ham SizeCooking TimeGlazing Begin Time5 to 7 lbs1. 5 to 2 hours30 minutes before its done8 to 10 lbs2 hoursto 2.5 hours50 minutes before its done11to14 lbs2. 3 to 5 hours1 hour from being finished
You should also be sure to monitor the internal temperature of your ham for optimal results. As a rule of thumb, this means the internal temperature of your fully glistening and done cooked ham should be 140°F (60°C).
Hams and Glazing Options
It is important to understand what kind of ham you’re cooking because different types like adornment with particular glazes:
Smithfield Ham: Experiment with a maple syrup glaze for a sweet, deep flavor.
Spiral-Cut Ham A honey-mustard glaze heightens its tenderness.
Country Ham: A pungent glaze made from brown sugar is what brings out its savory notes.
For glazing tips and more ways to up your cooking game, visit sites such as Food Network and Epicurious.
Learn how to craft your own ham into a crowd-pleaser by mastering the importance of glazing techniques. Be willing to experiment with different combinations and approaches until you discover what is most effective for you!
The Most Common Errors to Avoid When Cooking Ham
Ham Cooking can be a delicious experience but not without its challenges. Mistakes in the process can turn out dry, overcooked or bland results. Here are some common mistakes to watch out for when cooking ham, so you can have a mouthwatering meal every time.
Choosing the Wrong Ham
Choosing the wrong type of ham is one of the early missteps. There are several kinds, including:
Fresh Ham: It is uncooked and should be cooked all the way through before eating.
City Ham: Cured with water and fully cooked; just heat it.
Country Ham: Another dry cured option, and often needs extended cooking times.
Spiral-Cut Ham: Already sliced for easy serving, often cooked.
Knowing what type of ham you have can determine not just cooking time but how the meat is seasoned.
Ignoring the Cooking Time
Every type of ham has a distinct cooking time. It’s easy to ignore these tips and wind up with undercooked or overcooked meat. Here’s a basic guideline:
Type of HamCooking Time (per pound)Pre-Cooked Ham10-15 minutesUncooked Fresh Ham20-25 minutesCountry Ham18-20 minutes
Be sure to check with a meat thermometer that the ham reaches the appropriate internal temperature, which usually is around 145 °F (63 °C).
Not Letting It Rest
When your ham comes out of the oven, be patient. A common mistake is slicing it too soon. Let the ham rest for at least 20 minutes, so its juices can redistribute. Doing this, will yield a juicier and quite flavorful dish.
Overdoing the Glaze
A glaze can enhance the flavor of your ham, but too much of it will give you a gooey, too-sweet crust. Follow these tips for glazing:
Brush the glaze on for the last half hour of cooking.
Use a small amount-a little bit goes a long way.
Savory elements such as mustard, or herbs to balance sweetness.
Using a well-cooked, balanced glaze will allow you to add flavors without masking the ham’s natural one.
Skipping the Seasoning
Despite being cured, however, many cooks err by failing to season. Even cured hams can use some added spices. Here are some seasoning suggestions:
Black pepper
Garlic powder
Thyme or rosemary
Brown sugar for sweetness
Be sure to add these seasonings early on so it can soak into the meat.
Using The Wrong Cooking Technique
Fallible proposition Because the methods can differ, so do the results. # Common methods include baking, boiling or slow cooking. Both approaches have advantages and disadvantages:
Pan Frying: Produces a hard golden crust, but if you aren’t careful turns into a mess.
Boiled: This method may help the ham to retain moisture, but some flavor may be lost.
Slow Cooking: Great for cooks on the go, as flavors can meld together over a period of hours, but it can lose texture.
Forgetting About the Leftovers
Ham leftovers hold much promise that is often overlooked. Instead of letting it hang out in the fridge for ages:
Make ham sandwiches for lunch.
Add it to soups and casseroles.
Chop it for breakfast scrambles or omelets.
Celebrate a leftover ham just as much as the main dish!
By steering clear of these common pitfalls, you’ll be well on your way to cooking a delicious ham that everyone in your family will enjoy. To discover more ham-cooking advice, visit Smithfield and Honey Baked Ham for recipes and guidance.
Conclusion
Cooking a ham requires the understanding of ideal cooking times, knowledge of what makes them juicy and techniques that helps with flavor. Depending on the weight and style of ham purchased, you can create an ideal cooking time that suits your meal. Do keep in mind that not only is flavor important but the proper internal temperature for safety as well. A trusty meat thermometer will help you feel confident that your ham has fully cooked.
In addition, glazing your ham can take that flavor profile from a good dish to the moment where guests will keep talking about it. Try out various glaze recipes and get creative to find what you prefer, but remember when working with sugar (or syrup), the burn/caramelization point will need your attention to avoid burnt or caramelized coats.
Like any other cooking endeavor, there are mistakes to avoid. Don’t overcook or undercook — both make for dry, inedible or unsafe meat. But a little planning ahead — and adhering to these guidelines — will help ensure that your ham is moist, flavorful and the centerpiece of any gathering.
By concentrating on these facets—what is the best cook time based on weight and type, what does juiciness mean, what are proper order of internal temperatures, how to glaze properly and mistakes to avoid—you’re already well on your way to preparing a delicious ham that will have guests coming back for more. Take in the journey, have fun cooking and relish in the delicious byproducts of you labor.